New Fan Works
Old Fan Works
Zelda Series
Multimedia
Features
Interactive
Site Info
New Fan Works
Old Fan Works
Zelda Series
Multimedia
Features
Interactive
Site Info
|
Getting to Level 4
|
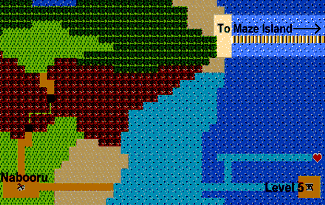
Level 4 is located on the Maze Island.
The olny way to get there is across this bridge in the northeastern part
of East Hyrule. |
|
Level four is on the eastern part of Maze
Island. You will hav to navigate through a maze of hidden battle scenes.
Now you know why it's called Maze Island. |
WAIT! Did
you get the Fire spell from Nabooru, and the Refelect spell and upthrust
from Darunia?
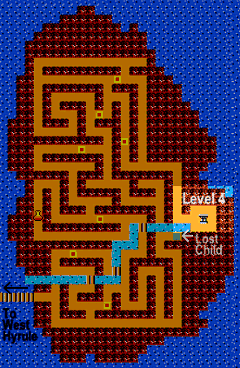
Click here to open the level 4 map in a new
window
Rooms You Need
to Know:
-
B3: locked door
-
C2: locked door
-
C3: key
-
C6: key
-
D3: boss
-
D6: locked door,
magical boots
-
E1: key
-
E2: locked door
-
E4: key
Level four has an annoying
series of pits that make you fall to the next floor, make sure to avoid those
until I tell you to fall down them. The special item in this level is the
magical boots, and the boss is a giant Wizzrobe.
-
The first thing you
need to do is...you guessed it! Get a key! From room A1, take the elevator
down to B3. Then go right one room to B4. Take the elevator down one floor
to C4. Next, go right two rooms to C6. Be careful in C5, you have to jump
over a pit or you'll fall down to the next floor. Make your way to the
right end of C6 to get the key.
-
The next thing you want
to get is the special item, the magic boots. They let you walk on water
in the overworld. From room C6, go left one room to C5. Now it's time to
fall down that pit. You'll end up on top of a disintegrating bridge in
D5. Quickly make your way to the ledge on the right side of the room before
you fall down another pit. If you made it safely, you'll be able to make
it to the next room. If you fall down the pit, you'll have to navigate
your way back up to C5. Assuming you made it to the ledge in D5, go right
one room to D6. Use the key you got in C6 to unlock the door and get the
magical boots.
-
Now it's time for another
key. From room D6, go left one room to D5. Fall down the pit and you'll
arrive in E3. Now go right one room to E4. Get the key on the right side
of room E4.
-
Once again, you have
to get another key. From room E4, go left three rooms to E1. You'll have
to use the key you got previously to unlock a door in E2. In E1, get the
key that's all the way on the left side.
-
Now you have to get
one more key before you can go to the boss. From room E1, go right one
room to E2. Take the elevator up three floors to room B4. Next, go right
two rooms to B2. You'll have to unlock a door in B3 on your way. From room
B2, take the elevator down to room C2. Now go right one room to C3 and
get the key.
-
Okay, now you can make
your way to the boss. From room C3, go left two rooms. You'll have to unlock
a door in C2. From room C1, take the elevator down to room D1. Next, go
right two rooms to D3. The boss in this level is a giant Wizzrobe. He may
seem difficult, but there is a simple strategy to beat him. First, make
sure you use your Reflect spell. Then just stay put in one spot in the
room. The Wizzrobe will appear and disappear at random, while shooting
little spells at you. Just keep refelcting the spells back at him. As he
continually jaunts around, the spells you reflect will hit him and eventually
kill him. This guy will be toast in no time. After you defeat him, go put
the crystal in the statue blah, blah, blah...you know the drill.
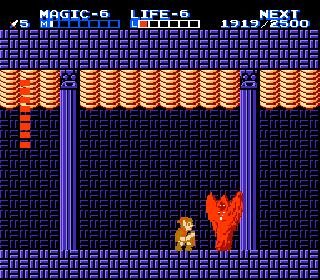
This guy'll rapidly appear and disappear
at random places in the room. Using your reflect spell, bounce back his
beams. After a while, they'll start hitting him. Just be careful, sometimes
he'll appear right on top of you.
|
|
Sections
Walkthrough
|